
At DesignHammer, we often develop WordPress sites using the Genesis Framework by StudioPress, which builds upon the existing WordPress foundation to provide additional features with its hook-driven code architecture. While the Genesis Framework is not a usable theme on its own, it does serve as the basis for child themes that leverage their parent theme's power.
Using a parent-child theming strategy is not unique to Genesis Framework scenarios. WordPress child themes are unique themes that borrow heavily from other "parent" themes, but with some customizations in code logic and/or style that make them unique from their parents. An aspect that makes using child themes attractive is the ability to fine-tune an existing theme (a "parent") to meet more custom needs without starting from scratch or editing existing theme code that would be better left untouched (imagine the hassle of applying updates to a theme you’ve edited and potentially losing all of your custom work).
One consideration with child themes is that the relationships are limited to “parent-child” and cannot span to “parent-child-grandchild.” In other words, if we need to customize a Genesis child theme, we cannot do so by creating another child theme based upon the existing theme as it’s already a child of the Genesis Framework. An ideal solution would allow us to customize a new child theme without touching the Genesis child theme’s code. One approach is to create a plugin to serve as a pseudo-child theme for a Genesis child theme. For simplicity’s sake, I'll be referring to the "pseudo-child" theme plugin as the "grandchild" throughout the course of this tutorial, despite there being no such thing in WordPress.
Getting Started
For this walkthrough, I’ll be working with the Genesis Child theme “Genesis Sample” and will be creating a plugin called “Genesis Sample Theme Child.” You’ll also need a copy of the Genesis Framework which you can request for free on the StudioPress website.
To get started, we’ll be using the WordPress Plugin Documentation as a structural basis for our plugin. Make sure you’ve got the Genesis Framework installed and a Genesis child theme (such as the free Genesis Sample which I’m using here) installed and activated first.
Plugin Foundation Code
First, create a folder within the plugins directory that will contain the grandchild plugin; I’m calling mine genesis-sample-child. Within the newly-created plugin's folder, create a php file with the same name of the folder; in this example, the name would be genesis-sample-child.php. Add the standard plugin headers to the php file to properly identify the plugin.
Since the plugin depends on a specific theme to operate, the plugin requires logic to only perform actions if that particular theme is active. An action hook is needed to achieve this since the logic must fire at a later point in the loading of a page than when the plugin would load otherwise. The after_setup_theme hook is a good choice to use here since it can determine if a specific theme is active after the theme is loaded. The callback function then checks to see if a given theme is active and exits if the desired theme is not active.
To make styling the grandchild theme easier, I like to add a body class that identifies that the grandchild theme is active and to easily distinguish its styles from the "parent." I accomplish that by using the body_class WordPress filter in genesis-sample-child.php.
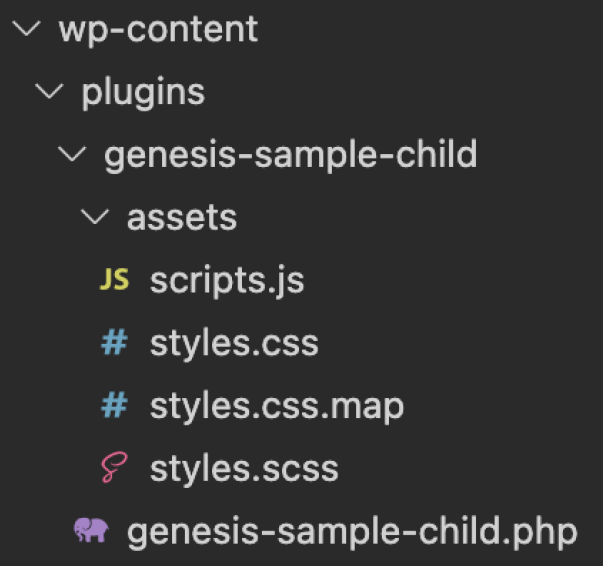
Following standard operating procedure for a regular child theme or plugin, any custom stylesheets and scripts must be specifically added. I've chosen to use SASS to generate my assets/styles.css file and have manually created assets/scripts.js. Here's what my directory looks like now:
Next, enqueue the custom script and style:
Note the use of the plugins_url function in the code sample above; I've found that using that function along with the _FILE_ magic constant is the easiest way to refer to the correct directory when enqueuing styles and scripts since it prevents guesswork when navigating the directory tree. See the WordPress plugins_url documentation for more info.
Adding Page Templates
In my current set-up, I have the necessary pieces of a child theme plugin in place; however, there's still one major feature remaining that a developer would expect to find a standard child theme: page templates. While configuring them in our grandchild plugin is not as straightforward a process as it would be in a standard child theme, there is a creative way to create additional page templates. The solution requires creating a PHP class and incorporating it into our plugin using the plugins_loaded action hook. Credit for this solution goes to Harri Bell-Thomas and his tutorial for adding page templates to WordPress with a plugin.
The first step is to create a page template file. I'm creating a templates directory and within it, I'm adding the un-imaginatively-named file page_blank.php; it's totally fine if the file has no content/code at this point. Here's what my directory structure looks like now:

Next, I'll explain (at a high level) the code needed to add page templates to the plugin; you can also refer to Harri-Bell Thomas’ tutorial (above) to see the template code and some additional details.
First, define the class and declare the needed properties:
The next step is to create the methods needed by the class. The first method to create is get_instance which will be used by the action hook later to make the template(s) available to the grandchild plugin.
The next method to create is the constructor, which defines the scaffolding of the class. In this case, the class' templates property (defined earlier) is set to an empty array. Next, add three different filters that correspond with three different filter hooks. Remember, these filter hooks aren't immediately being triggered, but are essentially adding tasks to a given trigger's queue.
These filter hooks and their callback functions perform key duties in configuring the plugin's page templates:
theme_page_templates: refers to its callback function to update the list of available templates within the theme. In the grandchild plugin, it works with theadd_new_templatemethod that will be created later.wp_insert_post_data: adds post data to a given post. In the grandchild plugin, it refreshes the cache and updates the list of available templates. It will work with theregister_project_templatesmethod which will also be created later.template_include: displays a new template on a page that's associated with it if the template file exists. In this plugin, it works with theview_project_templatemethod to be created later.
The final piece of the constructor is revisiting the class's templates property and populating it with an associative array of custom templates in a "file path => name" format.
Next, I'll do a quick overview of what's happening in our remaining three methods.
In add_new_template, the $posts_templates argument refers to existing templates; it gets merged with the class's template property array and returns the newly modified $posts_templates array to produce a revised list of templates.
The register_project_template method is a bit more complicated. It accepts an array argument containing the current post's post data and creates a cache key that corresponds with page templates. It then retrieves a list of existing templates in the current theme or creates an empty array if no templates exist. If there is a cache item that corresponds with the key defined earlier, that item gets deleted. The method's $template variable is then merged with the class's template property, and then a new cache item is added that uses the key created and the $templates array. Although the $atts argument wasn't used or modified, it must still be returned at the end of the function to finalize the process.
Lastly is the view_project_template method. The method accepts the $template argument, which refers to the current page's template that is about to be loaded. The method begins by declaring global $post in order to access the current post. If there is no $post or if the current post is not using a template that's recognized by the class, the $template argument is returned (continues to be loaded) without any further logic. Otherwise, the file path of the currently selected template is determined. If the file actually exists, it is returned; otherwise, the file is "echoed" and the $template argument is returned.
The final step in making the custom templates accessible via the plugin is to trigger the get_instance method with the appropriate action hook:
Working with Genesis Themes
Contrary to how page templates are designed in a standard theme or child theme, Genesis theming procedures are a bit different. I mentioned earlier that Genesis is a hook-driven theme; what I mean by this is that Genesis layouts and page structures are based on adding/removing/modifying theme behavior via WordPress hooks instead of directly editing a theme's php. If there's a section on a Genesis-themed page that you'd like to remove, the correct procedure is not to locate the Genesis or Genesis Child theme code and change it, but rather to determine what hook is being used to produce that section and to remove the action with your own separate custom code. Conversely, if there's a section you'd like to add, then adding an action is the way to go. The Visual Hook Guide by Genesis Tutorials offers a nice visual representation of the order of execution of hooks. Callback functions used in conjunction with the appropriate hooks can modify the look, feel or function of the theme.
For example, consider the first bit of code that checked to see if the Genesis Sample theme was being used:
In the code snippet above, after_setup_theme is the action hook being added and genesis_sample_active_check is the callback function that's actually performing the desired action.
When I'm working with Genesis themes, I like to use the Simply Show Hooks plugin to explicitly indicate which hooks are being used on a page and which callback functions are being called (I'd recommend that this plugin be used primarily in local development). Here's a look at that plugin in action while using the Genesis Sample child theme:
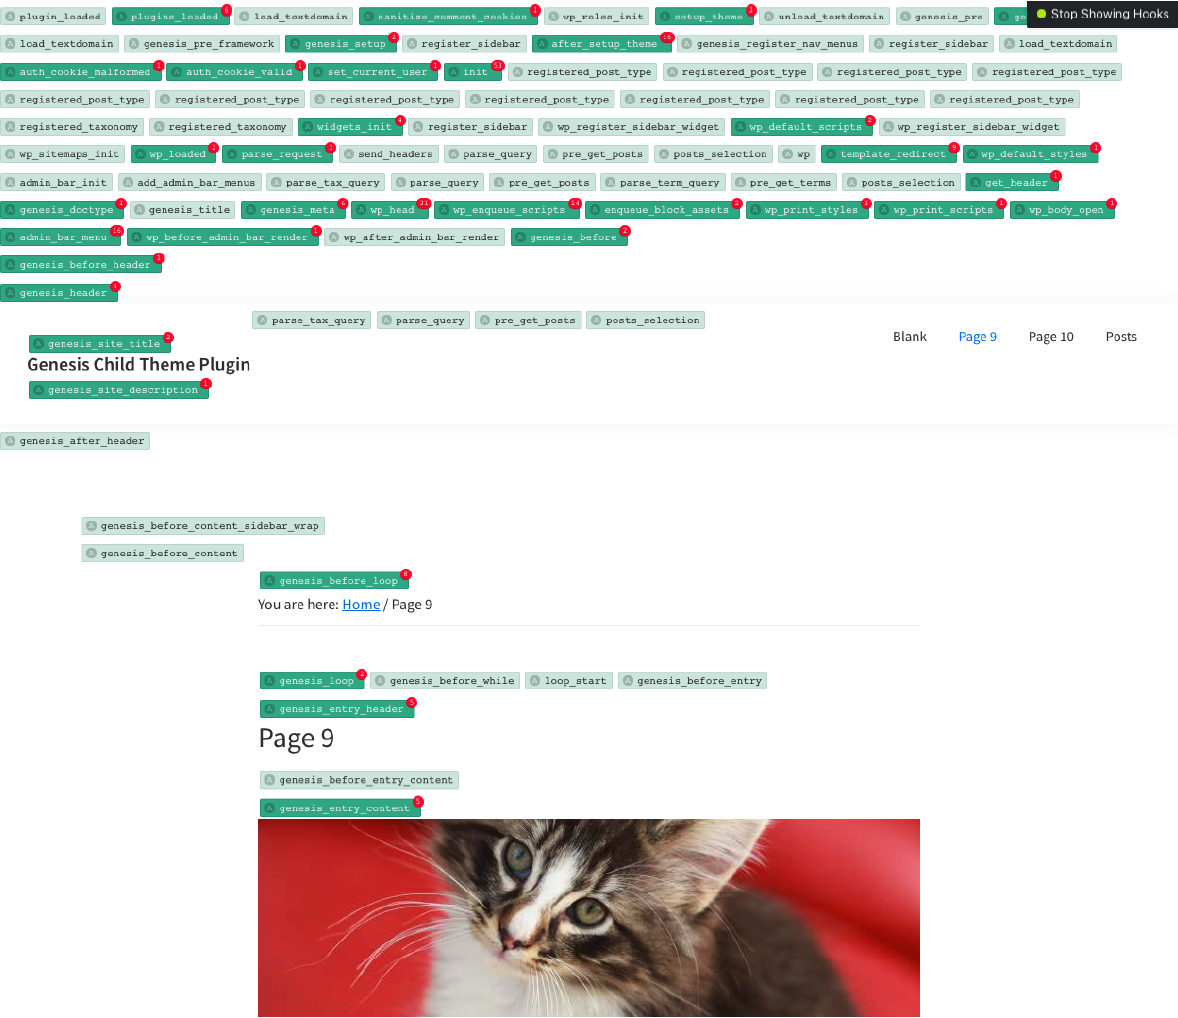
The dark green labels indicate hooks that are in use, and red circles denote how many callback functions are associated with the hook. Hovering over a dark green label will indicate which callback functions are in use and each function's priority. For example, here are the callback functions associated with the genesis_before_loop action in the Genesis Sample theme:

There are eight instances in our theme when the genesis_before_loop action is used. If I wanted to add a section of code that would be executed before the breadcrumb menu (assuming breadcrumbs are enabled in Customize > Theme Settings > Breadcrumbs), I'd add code something like this:
If I wanted to add a section of code below the breadcrumb menu, I'd add something like this:
Note the priority numbers and how they correspond with the priority number of the genesis_do_breadcrumbs function shown in the screenshot above and how they relate to the placement of content on the page.
You can use a similar strategy to remove callback functions from being executed by using the remove_action function. To do so, three pieces of information are needed:
- The name of the action in use (in this case, it's
genesis_before_loop) - The name of the callback function to remove (I'll remove the
genesis_do_breadcrumbsfunction in this example) - The priority assigned to the
add_actioncall that put this action in place to begin with. You can use the Simply Show Hooks plugin to determine the priority (hover over thegenesis_before_loophook to display callbacks and priorities) or search in the site's codebase to determine details about the action in question.
With those pieces of information, the breadcrumb menu can be removed; since an action is being used to remove an action, the remove_action function must be nested within another action that fires prior to the one being removed.
Creating a Genesis Child-Child Page Template
If the template file you created earlier in the tutorial is empty, now is a good time to add some code to it. The custom page template I'm using is templates/page_blank.php. First, make sure you add the standard page template header information. Then, follow the steps outlined in the "Working with Genesis Themes" section above. When working with a page template, the final requirement is to start Genesis:
Here's what my page_blank.php template looks like after I decided that I didn't want to display the sidebar or footer information on that page:
Wrap-Up
Although it's a bit unorthodox to create theme-like behavior inside a plugin, using a plugin to customize a third-party Genesis theme is a reasonable use case for the approach. In doing so, both the Genesis Framework ("parent theme") and the Genesis Child theme remain untouched. As it's a WordPress best practice to create a child theme to modify another existing theme, creating a custom plugin to modify a Genesis Child theme feels like the right thing to do. Keeping our modifications distinct from third-party themes helps protect against themes "breaking" or losing customizations when applying Genesis or Genesis child theme updates, and it also helps keep the codebase nice and tidy. By using the approach outlined above, you can create your own self-contained Genesis "grandchild" theme plugin that will function in a similar way as a standard, non-Genesis child theme.
Add new comment